|

Yes I now ..
the page takes some time to load .. but be patience..
 Maybe
you had one like this when you was a kid - I did .. Maybe
you had one like this when you was a kid - I did ..
And if you shaked it began to snow..
and they even exists now, I bought my own kids globes to..
There are so many more tutorials on net, even webrings just for "Globes",
here I tell you how I did mine with snow
..
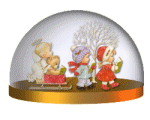
And here is one I made for the autumn ..
This tutorial was
created using Paint Shop Pro 7
but you can use earlier versions to...

Before you begin:
  Download the zipped file which include the
base,
and globe needed for this tutorial and unzip them. Export the globe.tub Download the zipped file which include the
base,
and globe needed for this tutorial and unzip them. Export the globe.tub
The image I used
are a Ruth Morehead image.
but you can use any image/tube you like
The
leaves, I get from the images,
but You can also use the Jasc's Autumn leaves
Or
use this image, (click the image, and it opens i a new window) or use my
tube, I made for this autumn globe..
If you want, you
can
use my globe selections.
 Remember
to save your work often!
Remember
to save your work often!
 Oki Oki
.. lets started and make your own..
Open the the image (or tube) you want to use and open the goldbase.psp and the
globe.psp
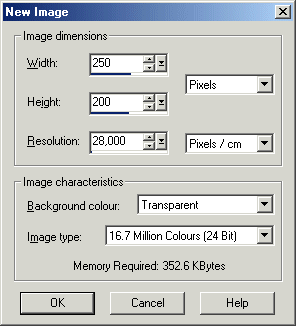
Create a New Image,
File - New,
Width 250 (the images width)
Height 200 (the images height)
Select Transparent,
for the Background Colour
select the OK button
1.
Copy the top elipse (goldbase.psp)
back to your image and paste as new layer,
Or just pull the "Top Elipse"layer, into your new imge
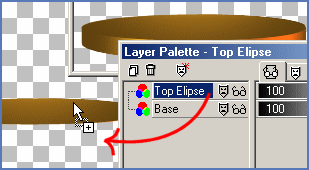
Rightclick on the layer and rename it "Top Elipse".
(or if you want to use selection, copy the "top Elipse" layer,
and when you have your new image selected, choose Seletions - Load from
disk, find the "globe_top_elipse" selection and choose Edit -
Paste - Into selection.)
2.
Create a new layer, name it what ever you want ..
and paste your image or tube, in a size that fits the "Top Elipse"
.. (my tube, scale 30) ..
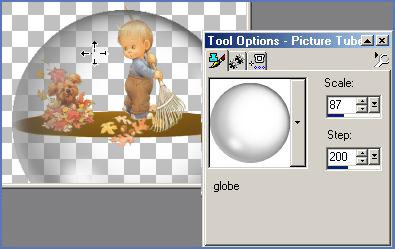
3.
Create a new layer named Globe. Use the  Picture Tube tool and tube the globe in scale 87, see my settiungs below.
Then use the
Picture Tube tool and tube the globe in scale 87, see my settiungs below.
Then use the  Mover tool and place it into position.
4.
Create a new layer, named "Base", repeat step 1. but copy the
"Base" layer instead ..
5.
Now ..
.. to Delete the glow under the "Top Elipse"
- select the "Base" layer, use the  Magic Wand tool and click in a emty area.
- change layer to the "Globe" layer, hold Ctrl an click in a
emty area.
- use  FreeHand
tool (type freehand), FreeHand
tool (type freehand),
hold Ctrl and "draw" around the part in the bottom
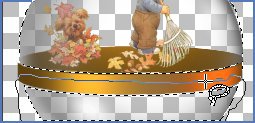
- Selects - Invert, and press delete key ..
(Or to use selections, tube the globe, load the load the selection,
Selections - Load from disk,find the globe_inside.sel, use the
Mover tool and move the globe to fit the selection, then choose Selections
- Load from Disk, find the globe_outside.sel, and press the delete key.)
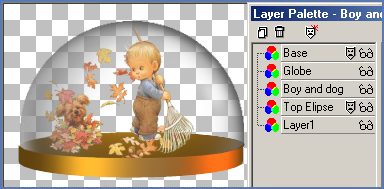
Now your image and layer palette would look like this
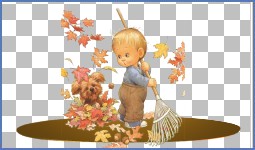
Now the Leaf ..
And .. the more you work on it .. the better result,
and maybe this will take a little time to do and to get it just the way you want.
(For a better animation result, Create a new layer, named globe background,
choose Selection - Load selection, and find the globe selection, fill with
a color, choose
Layer - Arrange - Send to bottom, then back to the top of the layer
palette again..)
1.
Create a new Layer, named "Leaf 1".
Use the Picture
tube tool, and tube some leaves, on the top ..
2.
Go to Layers - Merge - Merge Visible.
3.
Now you want to save this "globe". Go to File - Save As.
Save this image as globe1 and as a psp format.
4.
Hit the "Undo" button once, (this will unmerge your layers).
Duplicate the layer, renamne "Leaf 2", and a few more leaves,
and move the layer a little bit to the right, uncheck the Layer Visibility, press the "glasses"  ,
,
Now follow the steps 1-4 a couple more times.
But for each new layers, for each step,
add a few more leaves, and alternate, move to the right and to the left,
to get a zigzag pattern when the leaves fall ..
Each time save the "new" image as
globe2, globe3 ..
I would recommend doing these steps at least 5 times, and save one image
without falling leaves to..
(I made 13 new images, and one without falling leaves)
Now let's animate the globe !
1.
Animating the Globe
Go to File - Jasc Software Products - Launch Animation Shop.
In Animation Shop, go to File - Animation Wizard, or press  . .
- In the first dialog box, choose "Same size as the first image frame" and click on Next.
- In the next dialog box, choose "Transparent" and click on Next.
- The settings in the third dialog box don't matter since
all the images have all the same
size, so just click on Next.
- In the following dialog box, choose "Yes..", and set the value to
15. Click on Next.
- Click on "Add Image" and select your globe images
(holding down the Shift key allows you to select them all at once).
Click on Next.
- On the next window that pops up click on Finish.
2.
Go to View - Animation, or press the View button  to see your snow globe in action. ;)
Do you like it ..
This is the frame, and your would look similar like mine ..
 
3.
Select the 13th frame (F13) rightclick and choose Frame Properties, change
the Display time; 35. Select the last frame (F14) rightclick and choose
Frame Properties, change the Display time; 55.
4.
We started big so that we could see what we were doing. Now we need to resize the animation so that the file doesn't take forever to load.
Go to Animation - Resize Animation, set the value to 150 x 120 (190x150) pixel.
Then save your animation,
File - Save as .. and just follow the guide ...
|

 Download the zipped file which include the
base,
and globe needed for this tutorial and unzip them. Export the globe.tub
Download the zipped file which include the
base,
and globe needed for this tutorial and unzip them. Export the globe.tub