  
Vector Graphics
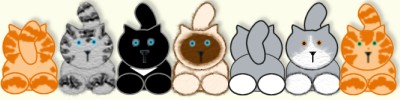
Cats ..
Create cats with the Preset Shape tool and vectorgraphics

This is a very easy tutorial, it can be done in PSP 6 or PSP 7 with a few little changes
See to that Tool Option is active

Create a new image, 200 x 200 , transparent background.
Click on the Preset Shapes tool.
Set the foreground color black,
and the background color grey, #AEB4B9
Click on the Preset Shapes tool again

Use these settings
PsP7
Type : Elipse
Width : 2
Antilias : checked
Create As Vector : checked
PsP6
Type : Elipse
Style : Stroke & Filled
Line Width : 2
 Antilias
: checked Antilias
: checked
Create As Vector : checked
draw an elipse shape , for the body
use the Object Selector tool,

and select Node Edit, 
Pull the bottom center nodes outwards
call the vectorlayer body (Kropp).
 Add new vector
layer... Add new vector
layer...
name this layer "feets". (Tassar)
and change the grey color to white
make two elipses
add new vector layer.
name this layer "head". (Huvud)
draw an elipse shape for the head ..
use Object Selector tool,
and select Properties,

"Vector Properties" option appears,
change "Fill" color, the white ... to grey ..
 ***
note ***
note
If you using PsP 6, you cant use this ..
you have to change color before you make the object ..
The ears ...
Select the "Head" layer (Huvud), click Node Edit
Now hold down the Ctrl key as you hover over the line...
when you see "add+" appear, click to add a node.
Do this again until you have 3 new nodes on each side
pull them and make them look like ears ... ....
Add new vector layer...name this layer "Nose". (Nos)
for the eyes and nose ..,
use the Preset Shape tool
 with
the same settings with
the same settings
but unchecked Antilias, and
make an triangle instead of a elipse ,
make the line with the Draw tool

Use these settings
Type : Single line
Width : 2
Antilias : unchecked
Create As Vector : checked
select the Object Selector tool,
and move the nose into position
.. ZOOM IN on your image ...
 The
eyes .. The
eyes ..
make them like you made the feets,
change color and make them smaller
and move the each eye into position
.. ZOOM IN on your image ... it helps ; )
The tail ..
Add new vector layer...name this layer "Tail". (Svans)
use Object Selector tool,
and create an elipse
click Node Edit,
make it look lika a tail, or almost like a bean
 to
quit, rightclick an chose Quit Node editing. to
quit, rightclick an chose Quit Node editing.
Hold on and move the "Tail"layer
and pull it underneath the "Head"layer,
Some details
a "fuzzy" white nose ..
Draw another white elipse
and node edit it into a shape, maybe like mine,
you really just have to experiment with the nodes
and adjusting the arrows on both sides of the node.
The more you try it, the better the result .
  Then use Then use
 the Retouch tool select Option the Retouch tool select Option
 and change Retuch Mode - Smudge, and change Retuch Mode - Smudge,
my settings;
Shape; Round,
Size; 8,
Experiment with the setting,
This will take a little time to get use to and to get it just
the way you want. Take your "Retouch" tool and start in
"small" sections and pull away from your image with it
around the edges of the nose. I "Retouch" the feets to ...
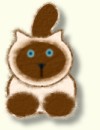
For this brown one, i used the Retouch tool, smudge,
and a filter texturizer ...
Isn't it cute ...
* notice ..
A vector layer must be converted to raster in order to apply effects and filters.
Don't forget to save often ..

Work in layers and let late the fantasy flow ..
And why not do a tub of yours cats ..
here you can find mine
-->
I hope you have enjoyed this Tutorial!
|